

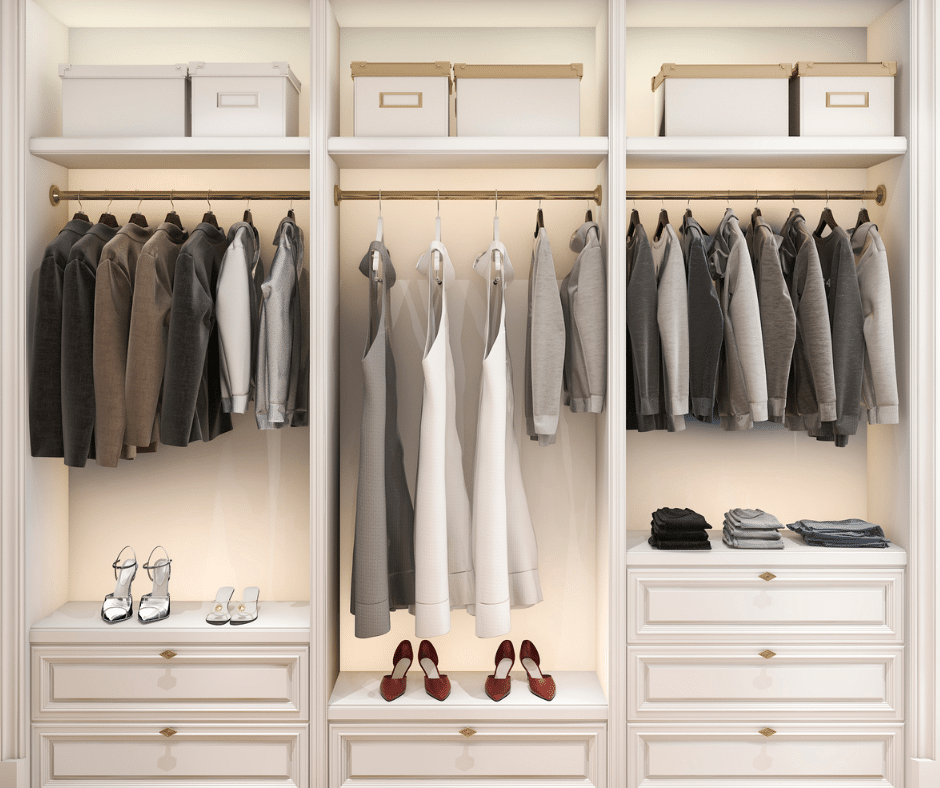
An organized closet isn’t just about aesthetics—it’s about functionality, efficiency, and even home value. Whether you’re dealing with a small reach-in closet or a spacious walk-in, a well-designed system can make a world of difference. As home inspectors, we often see cluttered, underutilized closets that could benefit from simple yet effective storage solutions. Homeowners may not realize how much space they’re wasting or how an unorganized closet can create stress in their daily routine. If you’re ready to take control of your closet space, this guide will walk you through every step of the process of a diy closet organizer.
Assess Your Closet Space
Before jumping into building an organizer, take some time to assess your needs. Many homeowners make the mistake of adding shelves and bins without first considering what they actually need to store. The first step is to remove everything from the closet and take inventory. This will help you see what you own and determine how much hanging space, shelving, and drawer space you need.
Next, identify problem areas—are your shoes piling up on the floor? Are clothes crammed onto a single rod with no space to breathe? Recognizing these issues will help you design a more functional setup. Finally, take measurements of the width, height, and depth of your closet. Knowing these dimensions will ensure that shelves, rods, and storage bins fit perfectly without creating an overcrowded or impractical layout.
Choose the Right Closet Organizer System
Every closet is different, so choosing the right storage system is crucial. If you want something long-term that adds value to your home, a built-in solution may be the best option. Built-ins provide a custom, polished look, but they do require more effort and planning. If flexibility is your priority, a modular system might work better, as it allows you to adjust components as your storage needs change.
When it comes to materials, there are budget-friendly and high-end options. Wood shelving provides a sleek, durable look, while wire shelving is cost-effective and allows for better airflow. Plastic storage bins are great for keeping small items organized and can be stacked for efficiency. If you want an easier installation process, pre-made closet organizer kits are widely available, but fully custom solutions allow for complete personalization. Whatever route you choose, make sure your materials are sturdy enough to hold up over time.
Step-by-Step Guide to Building Your Own DIY Closet Organizer
If you want a functional and visually appealing closet, follow these steps to build your own storage system:
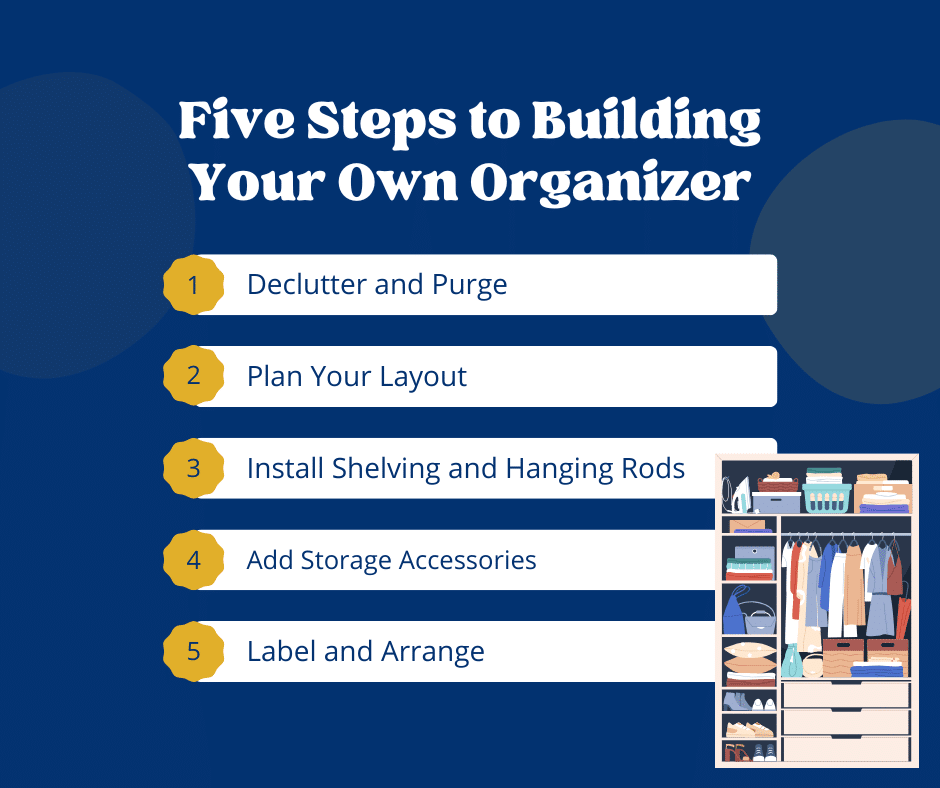
Step 1: Declutter and Purge
Start by sorting your items into three categories: keep, donate, and store elsewhere. If you haven’t worn something in over a year, it may be time to let it go. Many people underestimate how much space they can free up simply by decluttering. Consider storing seasonal clothing in labeled bins to keep everyday essentials more accessible. Shoes, handbags, and accessories should also be assessed—only keep what you actually use.
Step 2: Plan Your Layout
Sketch a rough design of your closet or use an online planner. The key is to optimize space while maintaining accessibility. Make sure to include:
- Hanging space: Allocate sections for long and short hanging items. This prevents wrinkling and maximizes vertical space.
- Shelving: Install shelves for folded clothes, shoes, and accessories. Adjustable shelves are a great option if you want flexibility in the future.
- Drawers or baskets: These help keep smaller items like socks, belts, and scarves organized. Clear bins allow for easy visibility, while fabric bins provide a cleaner look.
Step 3: Install Shelving and Hanging Rods
Proper spacing is key when installing shelves and rods. Consider these guidelines:
- Double hanging rods: Position the lower rod about 40 inches from the floor and the upper rod around 80 inches to maximize hanging space.
- Shelf spacing: Space shelves 12–15 inches apart to accommodate folded clothes and bins without wasting space.
- Secure installation: Always use wall anchors or brackets to prevent shelves from sagging or falling over time. A wobbly closet system won’t last long!
Step 4: Add Storage Accessories
Storage accessories can take your organization to the next level. Simple additions like over-the-door hooks, shoe racks, and drawer dividers make a big difference in maintaining order. Consider these useful accessories:
- Over-the-door hooks for purses, scarves, or belts.
- Clear bins or baskets for easy visibility of items.
- Hanging fabric organizers for sweaters and lightweight clothing.
- Drawer dividers to separate smaller items like jewelry, socks, and undergarments.
Step 5: Label and Arrange
Once everything is in place, labeling bins and containers can make a world of difference. This is especially helpful for seasonal storage or family closets where multiple people share the space. Keep frequently used items at eye level and store lesser-used items higher up. This arrangement keeps your space functional and prevents the need to dig through piles of clothing.
Common DIY Mistakes to Avoid
Creating your own diy closet organizer is a great way to improve storage, but there are some common mistakes that can lead to frustration down the road. One of the biggest issues is overloading shelves and rods. If you don’t check the weight limits of your materials, you may end up with sagging shelves or even collapse.
Another mistake is ignoring proper measurements. A small miscalculation can result in shelves or rods that don’t fit properly, leading to wasted time and materials. Lastly, using weak or low-quality materials is a common pitfall. Cheap plastic bins may seem like a cost-effective solution, but they often crack or warp over time. Investing in durable, high-quality storage solutions will ensure that your closet remains in good shape for years to come.
Maintenance Tips for a Long-Lasting DIY Closet Organizer
A customized storage system isn’t just a one-time project—it requires maintenance to stay functional. The easiest way to keep your closet organized is to regularly reassess your storage needs. As your wardrobe changes, so should your layout. If you find that certain sections are overflowing while others remain underutilized, it may be time to adjust your shelving or add new storage accessories.
Another important habit is rotating seasonal clothing. Keeping winter coats and bulky sweaters in your closet year-round can quickly lead to clutter. Instead, store off-season clothing in bins and switch them out as needed.
Finally, setting aside a few minutes each week for a quick tidy-up can prevent your closet from becoming a mess again. Hang clothes back in their designated spots, refold items on shelves, and ensure that everything stays in its place. These small habits will keep your system working efficiently and looking great over time.
Conclusion
Taking the time to install a closet organizer can completely transform your space, making it more efficient and visually appealing. By assessing your needs, choosing the right system, and following these step-by-step instructions, you can create a closet that works for you. The best part? You don’t need a huge budget or professional help to achieve an organized, stylish closet. Plus, maintaining an organized closet isn’t just about convenience—it can also make your home more appealing if you ever decide to sell. If you’re planning to buy or sell a home, an organized closet is just one part of a well-maintained property. Schedule a home inspection today to ensure your entire home is in top shape!